
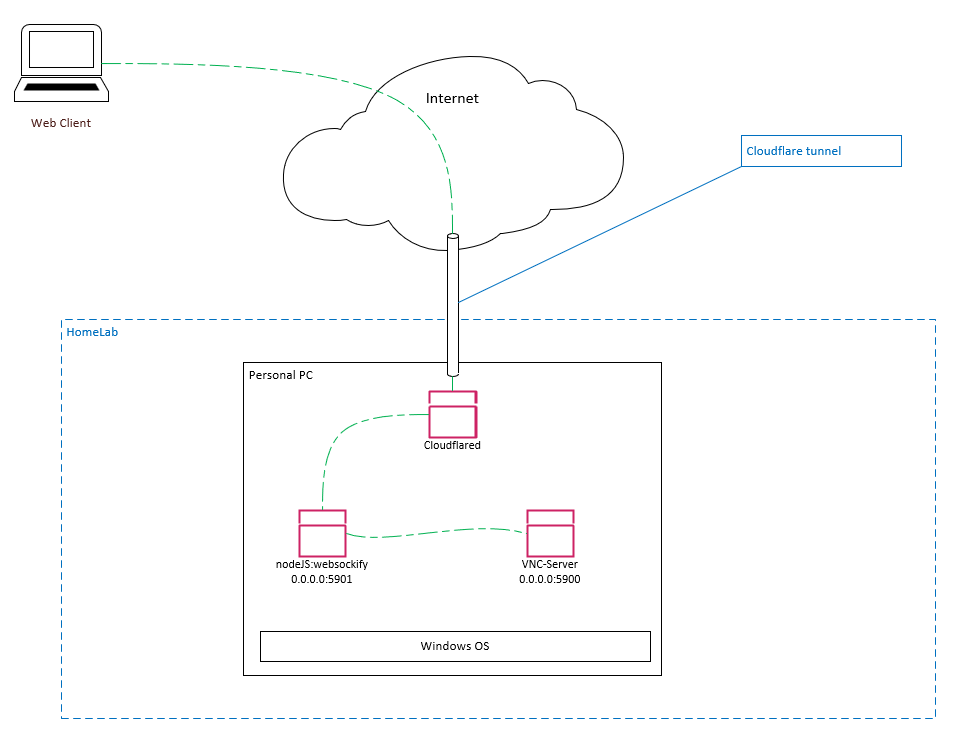
Concept
Allow remote desktop from any web browser from internet, without exposing RDP or port forwarding
Install
VNC Server
In this guide, we’ll install TightVNC. By default, it will be using port :5900 on all interface
- Download TightVNC installer for Windows
- Install from the installer downloaded, you can go to advanced and remove vnc viewer from the install option
- During the install, you can set 2 different level of authorization:
- Adminstrative
- Remote Access
- Install dfmirage. Link can be found in TightVNC install document
noVNC
- Download noVNC code to server computer
- Extract files to a folder (e.g. C:\ProgramData\noVNC\)
NodeJS – websockify
- Download and install NodeJS.
- Install websockify for nodejs with code below
- Create configuration for C:\ProgramData\noVNC\websockify\websockify.js (code below)
# Go to C:\ProgramData\novnc\
New-Item -ItemType Directory -Force -Path C:\ProgramData\noVNC\
New-Item -ItemType Directory -Force -Path C:\ProgramData\noVNC\websockify

cd C:\ProgramData\noVNC\websockify

# Install node-websockify
npm i @maximegris/node-websockify
npm i mime
npm i path
Mime type error fix
There’s a bug for mime type in the package:
- Open C:\ProgramData\noVNC\websockify\node_modules\@maximegris\node-websockify\websockify.js in editor
- Find
response.setHeader('Content-type', mime.getType(path.parse(uri).ext));and change it toresponse.setHeader('Content-type', mime.getType(path.parse(filename).ext));
Cloudflare Tunnel
- Login to Cloudflare Zero Trust dashboard and create new tunnel.
- Download cloudflared from the prompt and install on “server” computer.
- Open elevated command prompt
- Run the command prompted in Zero Trust dashboard
- Run the following command in PowerShell to check if service is running.
- Next, pick a name for public hostname, and forward it to
http://127.0.0.1:5901, where:5901is your noVNC port. - You can also check the tunnel status in Zero Trust dashboard.
# Check for Cloudflared service
Get-Service -Name "Cloudflared"
Configuration
VNC Server
We are going to configure TightVNC as service mode. So we can remotely turn it on (e.g. magic packet, turn on when AC power is detected) and start the remote connection automatically.
- Check if TightVNC is configured as service by running the code below.
- If no service is configured, follow the steps below to configure:
- Start Menu >
Register TightVNC Service
- Start Menu >
- To show tray icon, click the menu in
- Start Menu >
TightVNC Service – Control Interface
- Start Menu >
- You can open Configuration from tray icon
- If you want to change the listening port, configuration is available at Server tab.
- Disable
Java Viewer for web clientsfrom Server tab - Under Access Control tab, enable
Allow loopback connections - You can now try to connect remotely using VNC client to the server IP and port
# Check for TightVNC service
Get-Service -Name "TightVNC Server"

# Stop TightVNC Server
net stop tvnserver

# Start TightVNC Server
net start tvnserver
Websockify
- Create configuration for C:\ProgramData\noVNC\websockify\websockify.js (code below)
# Go to C:\ProgramData\novnc\
cd C:\ProgramData\noVNC\websockify

# Create config.js file
New-Item .\websock-config.js

# config.js file content
Set-Content .\websock-config.js "var websockify = require('@maximegris/node-websockify'); "
Add-Content .\websock-config.js "websockify({"
Add-Content .\websock-config.js "source: '127.0.0.1:5901', // Port configuration for client access"
Add-Content .\websock-config.js "target: '127.0.0.1:5900', // Port configuration from VNC server "
Add-Content .\websock-config.js "web : 'C:\\ProgramData\\noVNC\\'"
Add-Content .\websock-config.js "}); "

# run node.js with config file
node .\websock-config.js

# Firewall exemption will be prompted

# Ctrl+C to end the running program
// websocket config file
var websockify = require('@maximegris/node-websockify');
websockify({
source: '127.0.0.1:5901', // Port configuration for client access
target: '127.0.0.1:5900', // Port configuration from VNC server
web : 'C:\\ProgramData\\noVNC\\'
});From any web client, go to the configured server (e.g. http://192.168.2.1:5901 ), you should be seeing noVNC web interface.
Run node.js on startup
Run the following code in elevated PowerShell
# Prepare variables for Task Scheduler
$action = new-ScheduledTaskAction -Execute 'powershell' -Argument 'node C:\ProgramData\noVNC\websockify\websock-config.js'
$trigger = new-ScheduledTaskTrigger -AtStartup
$principal = new-ScheduledTaskPrincipal -UserID "LOCALSERVICE" -LogonType ServiceAccount

# Register scheduled task
Register-ScheduledTask -Action $action -Trigger $trigger -Principal $principal -TaskName "node-websocket" -Description "noVNC websocket running on node.js"